Adding users and setting up permissions
Invite users to your Buffer organization so your team can create posts, reply to comments, and view analytics using their own Buffer logins.
This guide is for organization owners and admins who manage users and permissions. If you were invited to another organization and need help getting started, see Getting started as a user in an organization.
:::info Notes
- You’ll need to be on the Team plan to add users to your organization.
- Team management settings are available only in the web version of Buffer. Sign in to Buffer on a computer to invite users or manage their access. These settings are not available in the mobile app. :::
Video: Adding users and setting up permissions
Watch the video below to learn more about adding users and being part of a Buffer organization.
https://youtu.be/mx54I8rWVBM?si=W3dKlKkR8VWwN4qR
How users and organizations work
Every Buffer user has their own organization, where they can connect channels that only they can access. They can also be invited to other organizations with an assigned level of access.
Invited users can switch between their own organization and any organizations they have joined. They will need to select the organization they want to work in after signing in to their Buffer accounts.
:::info Notes
- Inviting users to your organization is the most secure way to give them access. Users have their own Buffer login and access your organization’s channels from their own dashboard. They will never need to sign in to your account, so there’s no need to share your email address or password.
- While working with your organization’s channels, users can access the paid features included in your plan, even if their own Buffer account is on the Free plan. Most organization users have a Free plan for their personal account.
- A user can belong to multiple organizations and switch between them by selecting their profile avatar in the lower-left corner of the dashboard. :::
Once a user is in your organization with the right access, here's what they can do in each area:
- Publishing: create and share draft posts; you decide whose posts need approval before publishing. The posts they create go into your posting schedule, and you can see who created each post in the queue.
- Insights: view metrics for any channel they have permission to access. Exporting Insights as CSV, Markdown, or PDF is available to members with full Publish access on the channel — a view-only member sees the metrics but cannot export.
- Community: view and manage comments based on their Community access, which is separate from their Publish access. Full Access lets them reply to, like, and resolve comments; View Only lets them read comments without interacting; and No Access prevents them from viewing comments for that channel. You can apply the same access level across all channels or customize it per channel.
User permissions and access levels
When you invite a user to your organization, you can choose which social channels they can access in Buffer. Permissions can be set for our publishing and engagement features, and set individually for each channel.
You can also grant users Admin access. Choose carefully, as admins have full administrative control over your organization and can manage and connect new channels.
Community permissions are managed separately. See Community access levels below for details.
:::info Notes
- Admin access does not automatically include channel access. Admins must be assigned to each channel or add themselves before it appears on their dashboard.
- The organization owner always has Full Access to every channel. Their access cannot be changed to Needs Approval. :::
Publish access levels
Publish access determines whether a team member needs approval to schedule their content. It also determines whether they can approve other team members’ drafts:
- Full Access: The user can create, schedule, and publish posts for that channel.
- Needs Approval: The user can create drafts and submit them to an admin or organization owner for approval. Users with this access level cannot create posts from the Calendar view.
To see how the approval process works, watch our video on Requesting approval and approving draft posts.
Community access levels
Community access is managed separately from Publish access. You can apply the same access level across all channels or customize it for each channel.
- Admin Access: Same access as their Community permission level, applied across channels they can access
- Full Access: Reply, like, resolve, and view comments
- View Only: View comments only; reply, like, and resolve are disabled
- No Access: Cannot access Community for that channel
:::info Good-to-know: Community and Publish permissions are managed independently. A user can have Full Access in one tool and No Access in the other. Any level of Community access, including View Only, also allows the user to view posts for that channel so they can see which post each comment belongs to. :::
Inviting a user and setting their permissions
The Team plan allows you to invite unlimited users to your organization. You'll be able to add users from the web version of Buffer (this isn't available in the mobile app).
:::info Before you start
- Verify your own email address first. You won't be able to send invites until your email address is verified.
- Rename your organization before inviting people. All organizations are called "My Organization" by default, which makes it hard for users to pick the right one later. Here's how to rename your organization.
- A channel will only appear on a user’s Publish dashboard when they have posting permissions for it. :::
-
Click the + New button in the top navigation bar and select Invite a Team Member.

-
Click Invite a New User and enter their name and email address.
-
Toggle Admin on or off. Admins can manage team members and organization settings.
-
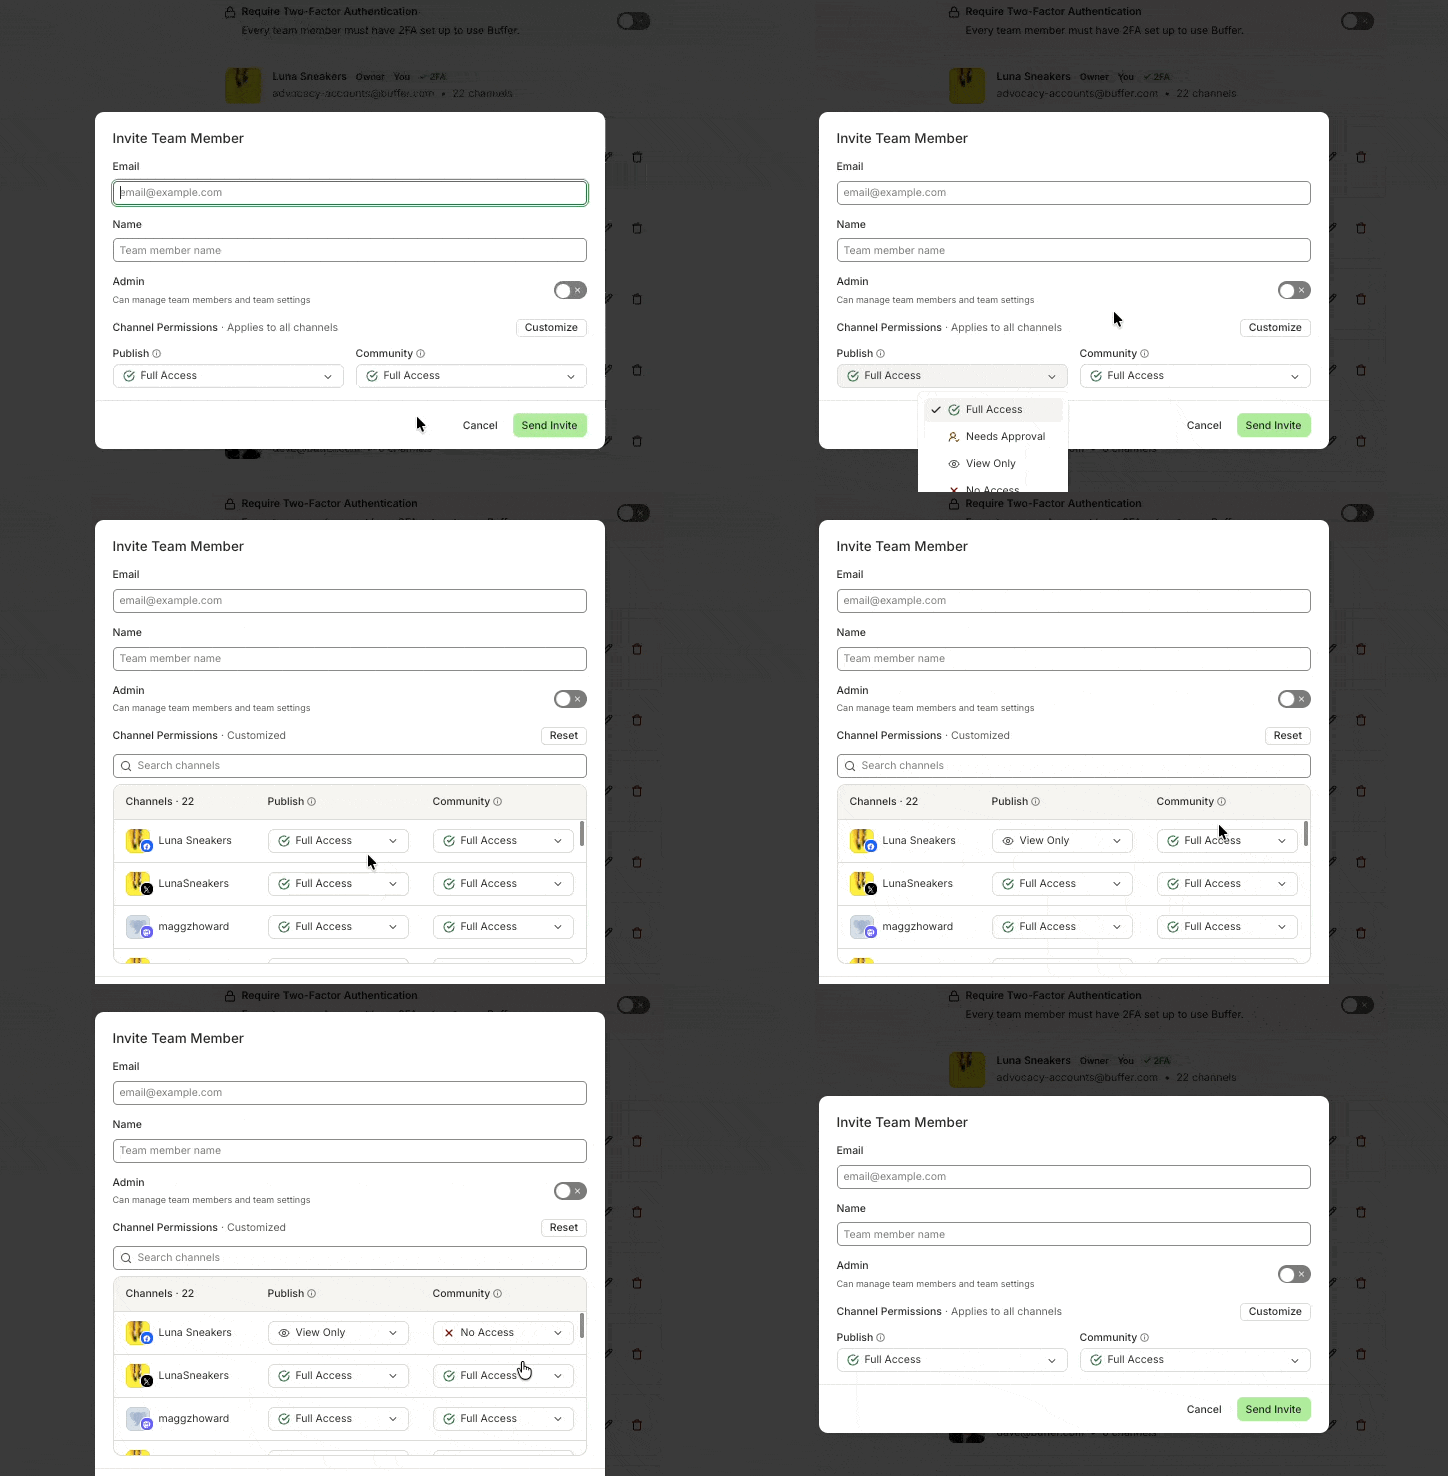
Under Channel Permissions, which apply to all channels by default, select an access level from each dropdown:
- Publish: Full Access, Needs Approval, or No Access
- Community: Full Access, View Only, or No Access
-
To set different access levels for individual channels, click Customize.
-
Click Send Invite. The user will receive an email invitation.
- If the user does not have a Buffer account, clicking View invitation will prompt them to create an account.
- If the user already has a Buffer account, clicking View invitation will prompt them to sign into their Buffer account.
-
After accepting the invitation, they'll be added to your organization and can access the channels assigned to them. Point them to Getting started as a user in an organization to help them get set up.
:::info If your user can't find their email invitation:
• Ask them to check their Spam/Junk folder.
• Double-check you entered their email address correctly (a typo is a common cause), then remove them and re-add them to generate a fresh invitation.
• Need help inviting a team member? Email hello@buffer.com with the user's email address, and we'll be happy to look into this for you. :::
Managing pending invitations
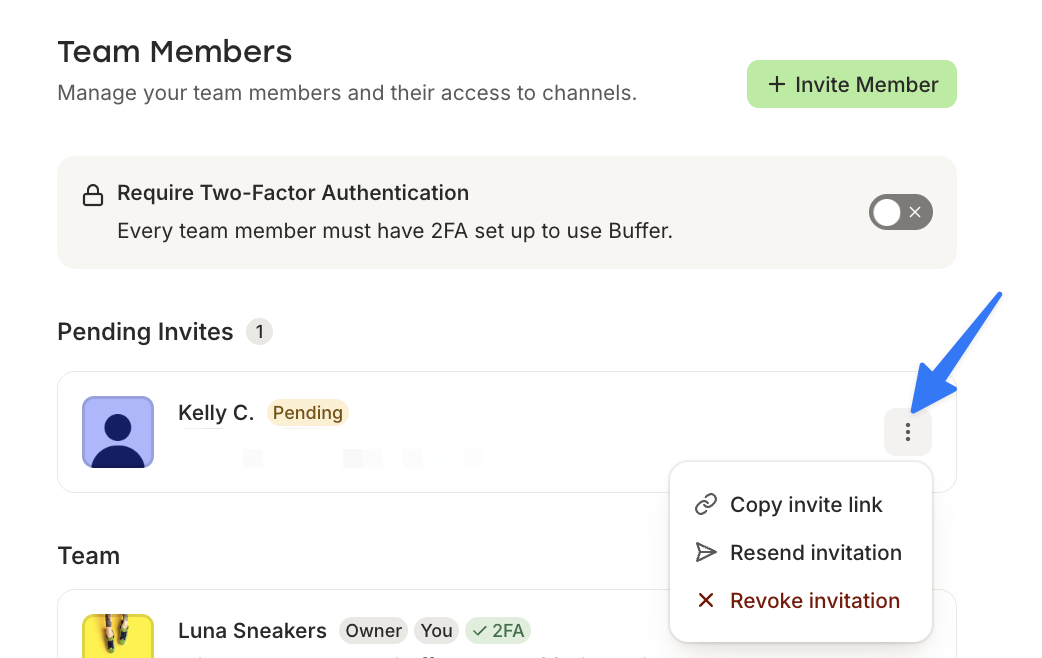
Pending invitations appear in a separate list above your active team members under Settings → Team, along with the date each invitation was sent.
Click the three-dot menu next to a pending invitation to:
- Copy invite link: Copy the current link to share directly with the user.
- Resend invitation: Send a new invitation and invalidate the previous link. Use this if the user cannot find the original email.
- Revoke invitation: Cancel the invitation and immediately invalidate its link. Use this if you invited the wrong person or no longer want them to join.
Finding a team member
For organizations with more than 10 team members, Admins will see a search field at the top of the Team Members list. Start typing a name or email address to filter your team down to matching members — the search runs across everyone in the organization, not just the members visible on the current page. Pending invitations are hidden while a search is active so results stay focused; clear the search box to see them again.
Why can't our team member see any of our channels?
This usually means they’re viewing the wrong organization or haven’t been granted channel access. If they see an empty dashboard, a "Connect a channel" prompt, or no channels, follow these steps:
- Switch to the correct organization. Ask them to click their profile avatar in the lower-left corner of the Buffer dashboard and select your organization from the list. The dashboard will refresh, and the channels they have access to should appear. See switching organizations in your Buffer account.
- Check their channel permissions. Go to Settings → Team, select the user, and confirm they have Full Access or Needs Approval for each required channel.
- Confirm they accepted the invitation. The user must accept the email invitation before joining your organization. If they do not already have a Buffer login, they will be prompted to create one. If the email is missing, check the address and resend the invitation.
:::info Give your organization a distinctive name instead of “My Organization” so team members can easily identify it. See Renaming your Buffer organization. :::
Removing a user
To remove a user from your organization:
- From your publishing dashboard, click your profile avatar in the lower-left corner and click Settings.
- Select Team from the left menu.
- Choose the user you'd like to remove.
- Click the trash icon (🗑️) next to their name.

- A confirmation pop-up will appear. Click Yes, Remove to complete the process.
:::info Note: Any scheduled posts, saved drafts, and posts submitted for approval by the removed user will remain in their respective queues. :::
FAQ
Do I need the Team plan to use the approval workflow?
Yes. Creating draft posts is available on all plans, but inviting users and requiring approval before posts publish are Team plan features. On Free or Essentials, there's only one user (the account owner). See Managing and approving draft posts.
Can a user have Full Access in Community and Needs Approval in Publish for the same channel?
Yes. Go to Settings → Team, select the team member, then click Customize to set separate Publish and Community access levels for each channel.
How do I give someone access without sharing my password?
Invite them as a user. They’ll use their own Buffer login and will only be able to access the channels assigned to them. You can update or remove their access at any time. There’s no need to share your email address or password.
Can I let someone else set up my account?
Invite them as a user and give them Admin access. They can then connect channels, manage users, and complete setup using their own login, while you remain the organization owner. You can reduce or remove their access afterward.
Can I give a client view-only access?
Yes. You can assign view-only access for both Publish and Community.
Can I change a team member's role or permissions after I’ve invited them to my organization?
Yes. You can adjust a user's Admin permissions or their per-channel access at any time. See Changing user permissions in your organization.
What happens if I revoke someone's Community access, but they still have Publish access?
Their Publish access remains unchanged, but they won’t be able to access Community for that channel.
Can my team members see their own permissions?
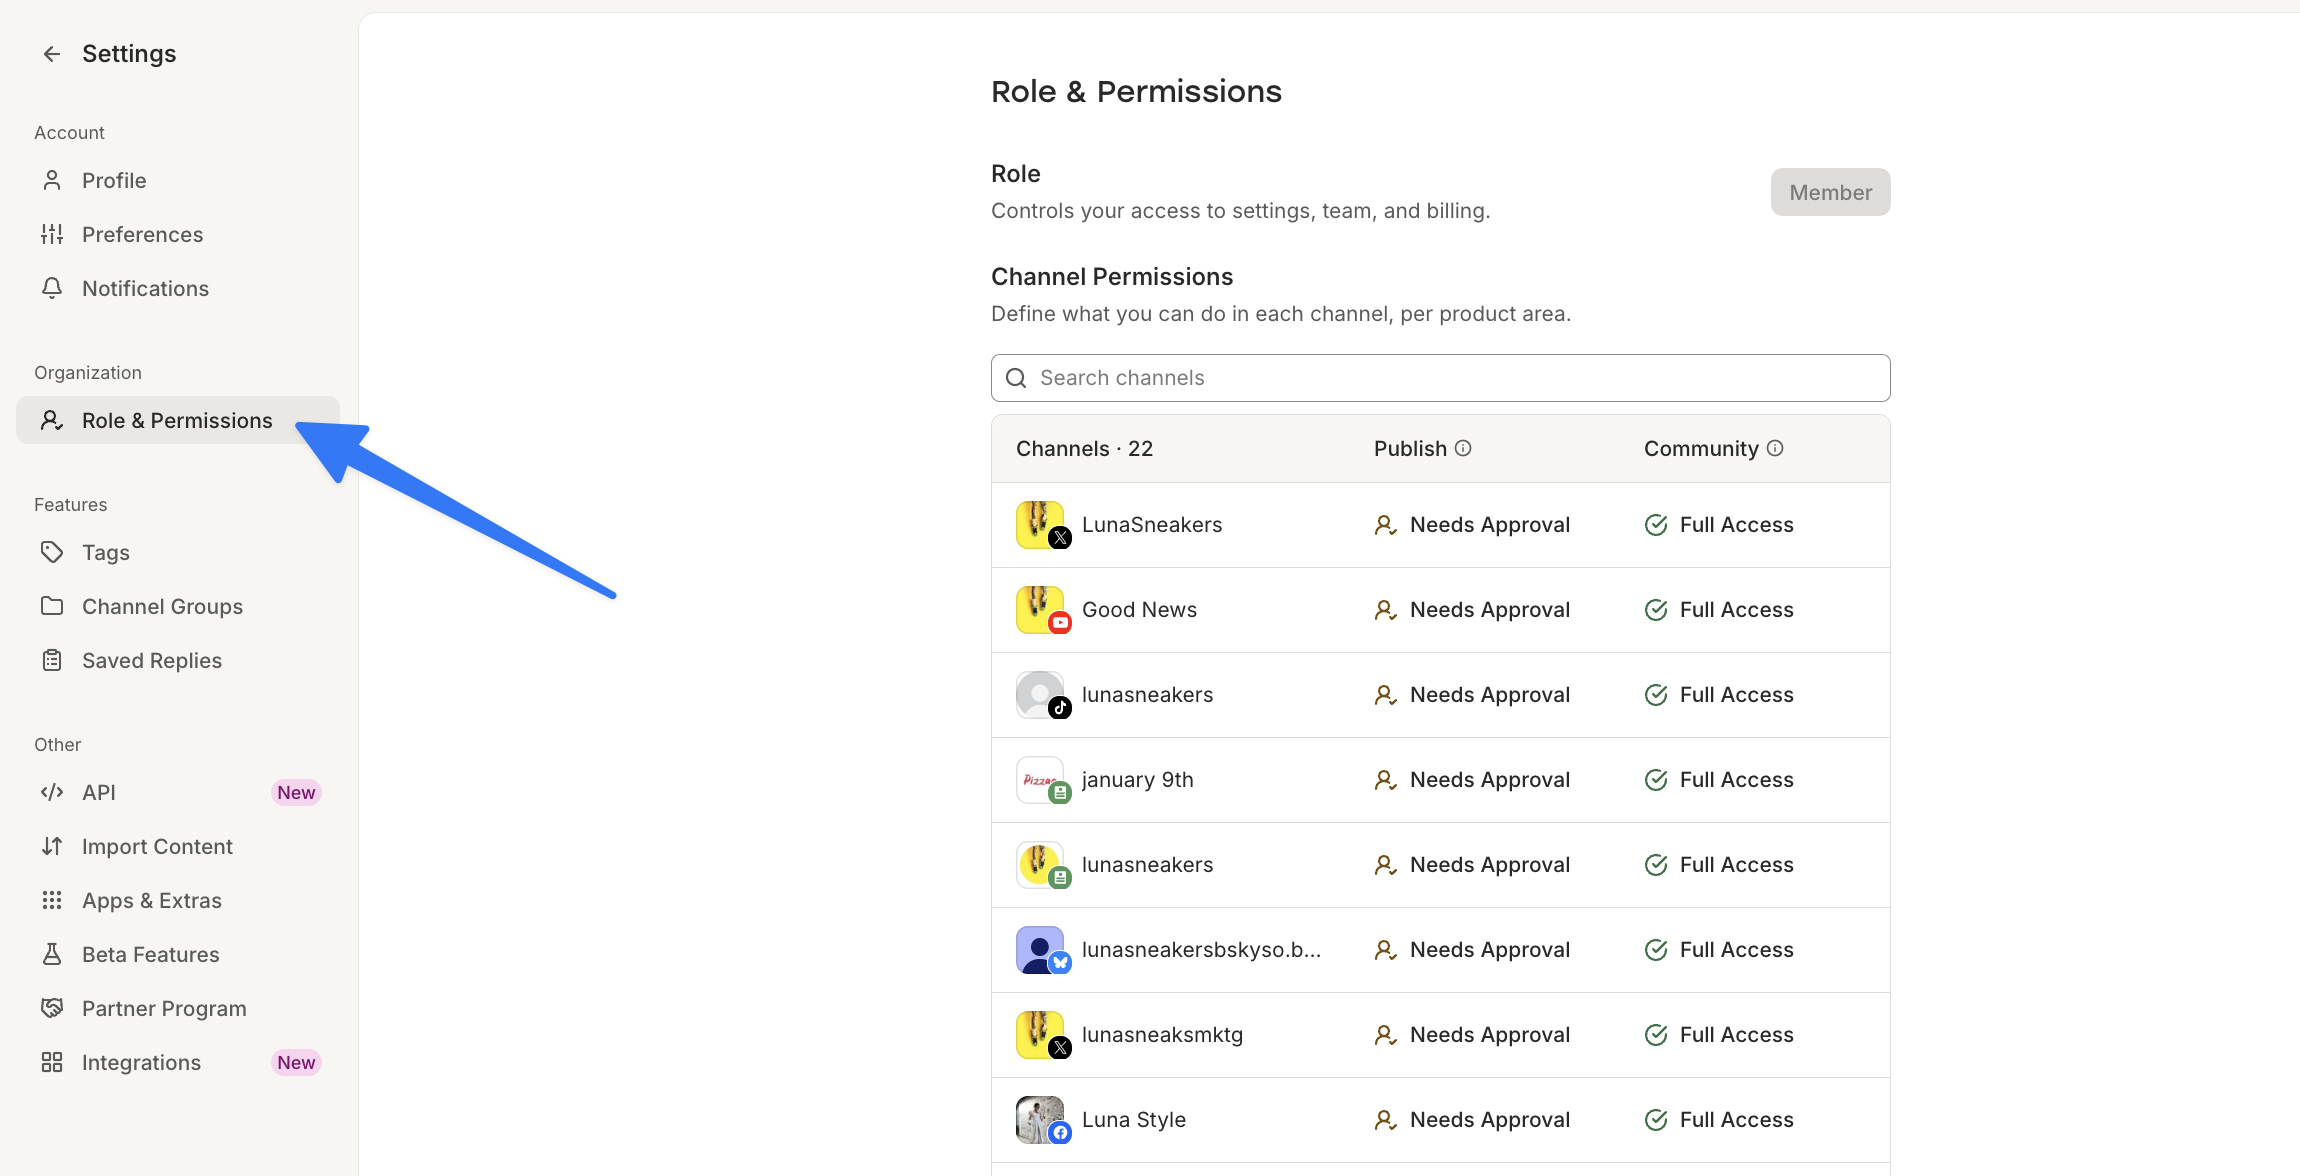
Yes. Invited members can view their role and channel permissions under Settings → Role & Permissions. This information is read-only, so they’ll need to ask an admin or owner to make changes.