Connecting your Instagram account to Buffer
Buffer can connect to both Personal accounts as well as Professional accounts. The publishing, analytics, and engagement features vary depending on which type of Instagram account you have connected to Buffer:
|
Connection Flow
|
Plan
|
Features available
|
|---|---|---|
|
Personal Instagram flow
No login required—uses mobile notifications to help you publish posts manually.
|
All plans
|
✅ Yes - Notification publishing* ❌ No - Analytics ❌ No - Engagement features
*(Read more about Using notification publishing here)
|
|
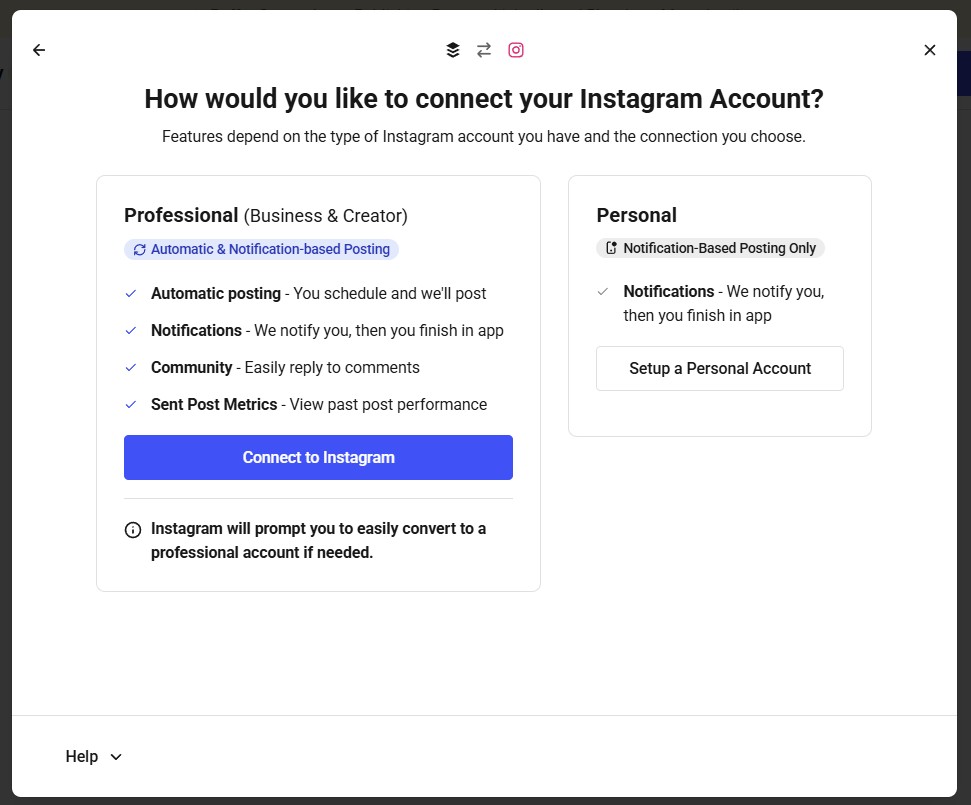
Connecting your Professional Instagram (Business or Creator) account through Instagram login
Log into instagram.com with your username and password to connect a Professional (Business or Creator) account.
|
All plans supported
Recommended for Buffer’s Free plan
|
✅ Yes - Notification publishing ✅ Yes - Automatic publishing ❌ No - Analytics ✅ Yes - Engagement features |
|
Connecting your Professional Instagram (Business or Creator) account through a linked Facebook Page.
Log in with your Facebook profile that's an admin of the Facebook Page connected to your Instagram Professional (Business or Creator) account.
|
All plans supported
Recommended for Buffer’s paid plans.
Also recommended for those who only have access to Instagram via Facebook / Meta Business Suite.
|
✅ Yes - Notification publishing ✅ Yes - Automatic publishing ✅ Yes - Advanced analytics & reporting ✅ Yes - Engagement features
Use this plan if you:
|
- Not sure what kind of Instagram account you have? Check out our guide here.
- If you see that your social channel is marked as "Unavailable" (like this), check out our article: Why channels are appearing as "Unavailable" when attempting to connect them to Buffer
- If the only way you can connect to Instagram is through Facebook, please use these these steps.
In this article:
- Connecting your Professional Instagram (Business or Creator) account through an Instagram login
- Connecting your Professional Instagram (Business or Creator) account through a linked Facebook Page
- Troubleshooting common connection errors and issues
- Issue: Only showing one Instagram account when you manage multiple under a single login
- Error: {"error_type": "OAuthException", "code": 400, "error_message": "Your activity off Meta technologies is currently turned off."}
- Error: Invalid session error 400
- Error: Your Instagram account is ineligible for using Instagram Business Messaging API.
Connecting your Instagram Personal account through an Instagram login
- ⚠️ Due to API limitations, we are not able to:
- post automatically to Instagram Personal accounts
- access analytics or comments within Community for Instagram Personal accounts.
- If you prefer to post automatically and wish to use Analyze with Instagram, you’ll need to switch your account type to an Instagram Business or Creator account and authorize through Facebook using these steps: Getting advanced analytics and locations for your Instagram account.
- 📝 Scheduling to Instagram Personal accounts is only available on our new plans. On a Legacy plan? Get in touch with us at hello@buffer.com to discuss your options!
- In Buffer, head to the Channels page by clicking this link or click on your profile avatar at the top right of your dashboard and then choose Channels on the left menu.
- Click Instagram (If you already have channels connected, click Connect New Channel and then find Instagram and click Connect).

- Select Set up a Personal account.
- Next, enter your Instagram Personal account username and click Continue.

-
Set up mobile notifications if you haven’t already.

- Then you’ll be good to go!

Switching a connected Instagram Personal account to a Professional account in Buffer
If you've connected your Instagram Personal account to Buffer and want to switch to a Professional account instead, head to your Channels page and click the 3-dot menu and choose 'Switch to Professional Account.'

Connecting your Instagram Professional (Business or Creator) account through an Instagram login
- After you have connected Instagram to Buffer, if you’d like to add locations to Instagram posts, and access advanced analytics, you’ll need to link your Instagram to a Facebook Page and refresh the connection using these steps.
- If the only way you can connect to Instagram is through Facebook, please use these these steps.
- If you manage multiple Instagram accounts with a single login, please see these steps.
- In Buffer, head to the Channels page by clicking this link or click on your profile avatar at the top right of your dashboard and then click Account from the drop down menu and choose Channels on the left menu.
- Click Instagram (If you already have channels connected, click Connect New Channel and then find Instagram and click Connect).

- Under “Professional,” select Connect to Instagram.
- Next, you’ll be prompted to log into Instagram.
- Allow your permissions. The first permission option will be automatically pre-selected. If your permissions look like this, you are all set and you can click "Allow" to finish connecting your Instagram professional account to Buffer.
Having trouble connecting? See our guide to common connection errors below for troubleshooting steps.
Connecting your Professional Instagram (Business or Creator) account through a linked Facebook Page
✅ Instagram needs to be a Business or Creator Instagram account.
✅ Instagram needs to be linked to its own Facebook Page (not profile).
✅ An Admin with “full control” needs to connect the Instagram account to Buffer.
✅ All permissions for all Pages and Instagram accounts need to be selected (even for those you are not connecting to your Buffer account).
- Log into Buffer on your computer (not mobile)
- Click here to manage channels, then choose to connect a channel and choose Instagram
- Click the “Help” option in the bottom corner and choose “Connect Instagram via linked Facebook Page”
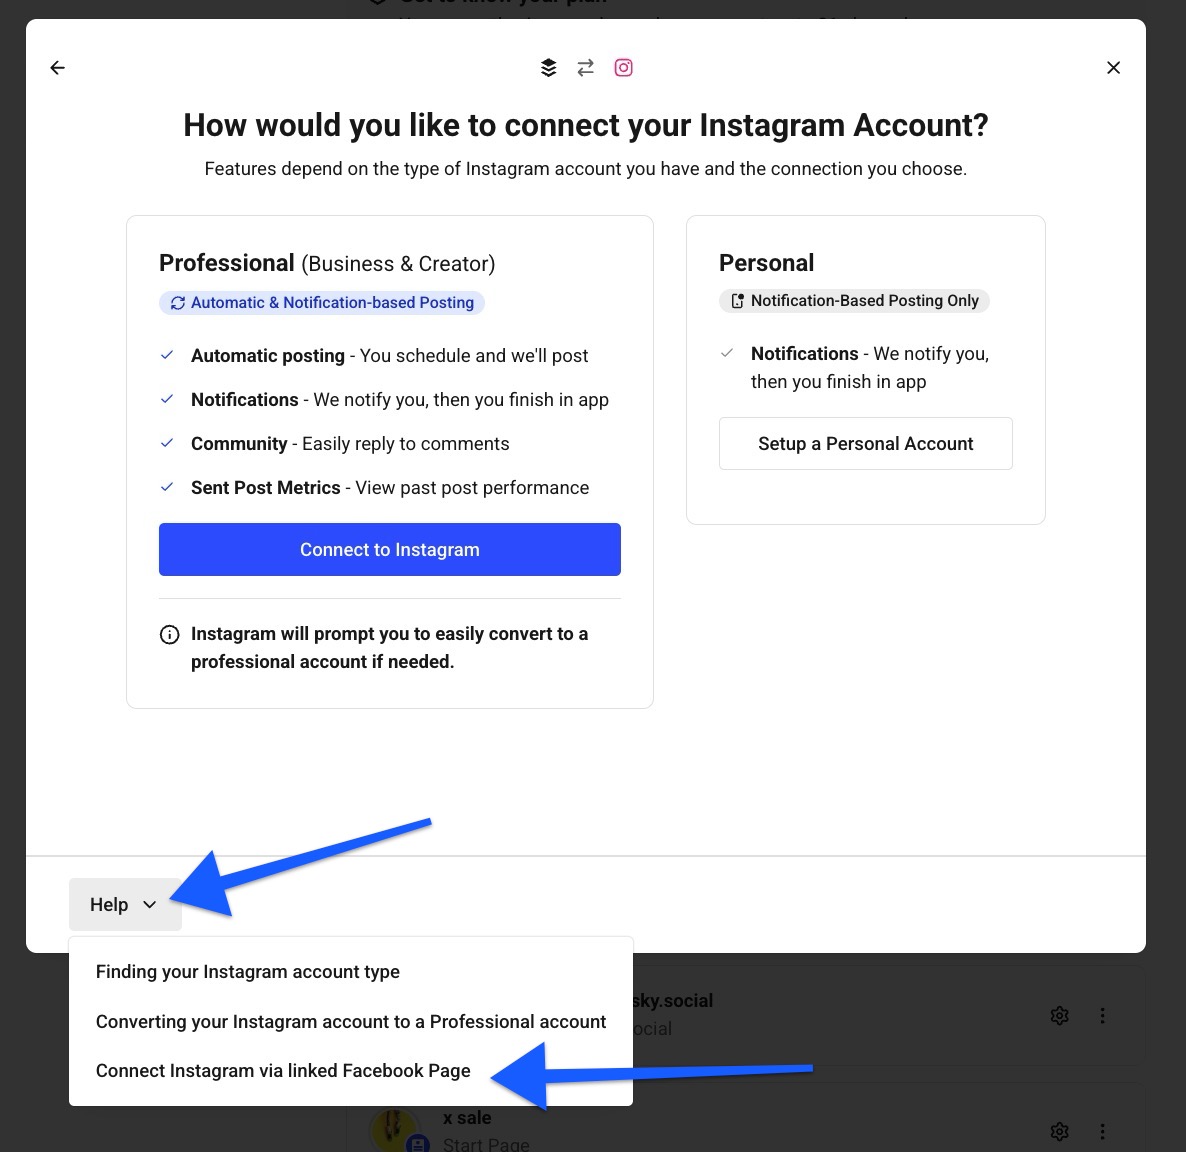
- If you’re having trouble linking your Instagram account to a Facebook page to complete this process, we have a troubleshooting guide here that can help you get everything linked correctly.
- If you already have your Instagram account connected to Buffer, but want to use our Analyze tool on our paid plans or use locations for your Instagram posts, you need to convert your connection by following this guide.
Troubleshooting common connection errors and issues
Issue: Only showing one Instagram account when you manage multiple under a single login
Instagram allows you to have multiple accounts linked under one email address, but those are actually individual accounts (even though you are logging in with the same credentials). Buffer can only connect one Instagram account from the email and password you enter and won't show a list of all of those Instagram accounts that you control under one email address.
To separate them to be able to add them to Buffer, you can give each Instagram account its own password using these steps:
- In Instagram, head over here and enter the Instagram handle of the account you want to connect to Buffer and then reset the password.
- Once the account has its own password, you can try connecting the account to Buffer using these steps.
Tip: You may need to try connecting the channel using an incognito or private browsing window if your browser is remembering the past credentials.
Error: {"error_type": "OAuthException", "code": 400, "error_message": "Your activity off Meta technologies is currently turned off."}
- Log into the account on Instagram.com.
- Visit https://accountscenter.instagram.com/info_and_permissions/off_facebook_activity/?entry_point=ACCOUNTS_CENTER
- A new page will appear, and you will select "Manage Future Activity."
- In order for things to work properly, the option for "Connect Future Activity" would need to be selected (screenshot).
- Once you've gone through this steps, please try connecting Instagram to Buffer again.
Note: you may need to repeat these steps for any other Instagram account you are trying to connect to Buffer.
Error: Invalid session error 400
This is a known issue that Meta is working to resolve.
Troubleshooting steps:
In some cases, customers have been able to connect Instagram by waiting a few hours and trying again.
Otherwise, you can try connecting to Buffer by linking your Instagram account to a Facebook page and following these steps to authorize Buffer.
Error: Your Instagram account is ineligible for using Instagram Business Messaging API.
This is a rare error we see come up sporadically when trying to connect Instagram by logging into Instagram directly.
Troubleshooting steps:
As a workaround, you can try connecting to Buffer by linking your Instagram account to a Facebook page and following these steps to authorize Buffer.
❓ Can our Customer Advocacy team answer any questions for you? Feel free to reach out via hello@buffer.com.