Using Buffer's API
Buffer's API is now available on all Buffer plans, making it possible for anyone to connect Buffer with other tools so you can automate tasks, build custom workflows, and experiment with AI assistants — no advanced coding required!
This guide focuses on practical, everyday automations using popular tools. If you’re looking for deeper technical documentation, you’ll find that in our developer docs.
⚠️ Heads up for API developers: We updated how media assets are submitted via the API on May 25, 2026. Mutations using the legacy assets input format will now fail. If your integration is affected, please review our Assets Input Migration guide to update to the current format.
Video: How to Get Set Up With the Buffer API and Your API Key
Watch the video below to learn how to get set up with Buffer's API and how to generate your API key.
Notes:
- The API Key is user-based, not organization-based, and can only be generated by organization owners at this time.
- API Keys are personal and won't be visible to the rest of the team.
- Organization members who attempt to create a key will be prompted to switch to an organization where they're an owner.
- Currently, Buffer's public API is focused on post creation and idea management. Post-level analytics are also available in a limited, experimental form — see Post metrics (experimental) below.
⭐ Paid accounts can generate up to five API keys. Free accounts are limited to one. API usage is shared across all your personal API keys.
In this article:
- Video: How to Get Set Up With the Buffer API and Your API Key
- Why use automations and workflows with Buffer?
- Before you start
- How to find your Buffer API key
- Using the Buffer CLI
- Supported functions and social channels
- Hosting media for use with the API
- Workflow automations (no coding required!)
Why use workflows and automations with Buffer?
Workflows and automations help Buffer work seamlessly with the tools you already use, so repetitive tasks can happen automatically instead of manually.
They’re especially helpful if you want to:
- Save time by reducing copy-and-paste work
- Automatically turn ideas, files, or submissions into Buffer posts or ideas
- Keep content flowing into Buffer from one central place
- Improve or format posts before they’re scheduled (including using AI)
You don’t need to start big. You can begin with one simple trigger that creates a post or idea in Buffer, then add more steps over time as your needs grow.
If you regularly move content into Buffer by hand or wish posting could feel more effortless, workflows and automations are a great place to start.
Before you start
To use Buffer’s API with any workflow or MCP (AI assistant) tool, you’ll need:
✅ A Buffer account with a verified email address. API access requires email verification. If you haven't verified your email yet, check your inbox for a verification email from Buffer, or head to your account settings to resend it.
✅ Access to the channels you want to use.
✅ Your Buffer API Key.
✅ An account with the tool you want to connect (like Zapier or Make).
How to find your Buffer API Key
To connect Buffer with automation tools or AI assistants, you’ll first need to generate your personal API key.
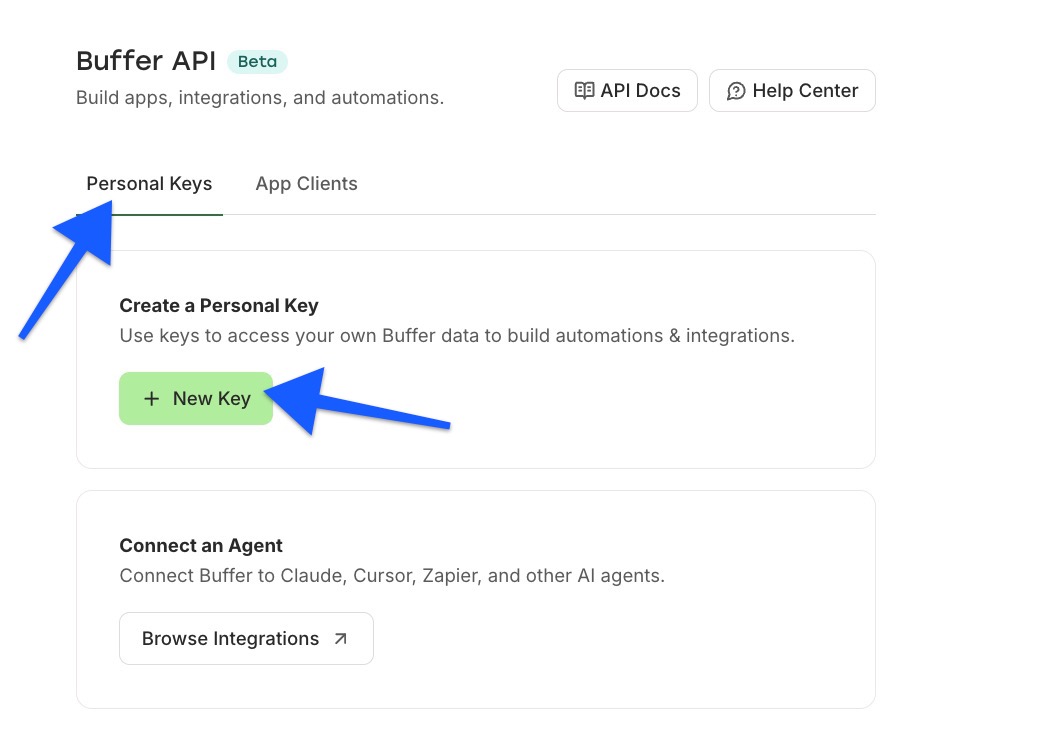
- Head to Settings → API.
- Click the Personal Keys tab if it isn't already selected.
- Under Create a Personal Key, click + New Key.
- Give your key a name (e.g. "Zapier" or "n8n workflow") so you can tell your keys apart later.
- Under Permissions, choose which scopes this key should have. All permissions are pre-selected by default. Uncheck any you don't want this key to be able to do — for example, leave only
postsReadticked if you just want a read-only reporting key. At least one permission must be selected. - Choose an expiration period -- 7 days, 30 days, 60 days, 90 days, or 1 year.
- Click Generate API Key, then copy it and paste it into the tool you're connecting.
💡 Notes:
- For security, the dialog shows the displayed key as partially masked. However, the Copy key button copies the full token to your clipboard. Paste it into the tool you're connecting.
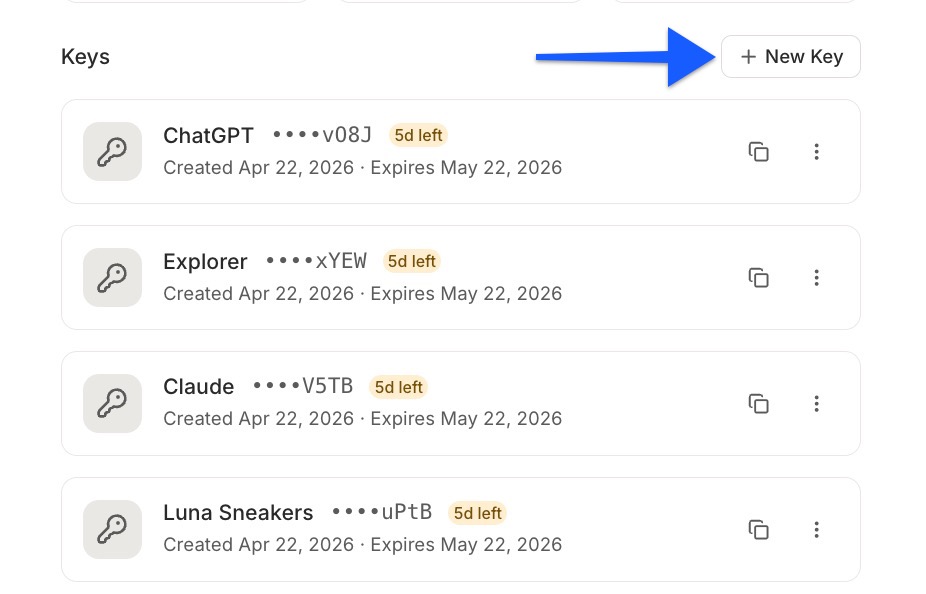
- Each key in your list now has a collapsible Permissions row beneath it. Click it to expand and see exactly which scopes that key carries — handy when you have multiple keys and want to check what each one is allowed to do before reusing or revoking it.
How to confirm it worked
After clicking Generate API Key, you should see a new key appear on the page. If you don’t see one:
- Refresh the page
- Make sure you’re in the correct organization
🔐 Keep your API Key secure
Your API key works like a password for connecting other tools to Buffer. Only share it with trusted apps and services. If you think it’s been exposed, you can return to this page and generate a new one.
The success dialog hides most of the key on screen so it's safe to take screenshots, but the full key is still copied when you click Copy key, so handle the pasted value with the same care you would a password.
📝 Note: If you need to revoke a key, you can delete it from this page and generate a new one.
How many API keys can I create?
The number of API keys you can create depends on your Buffer plan. If you try to create a new API key or OAuth client after reaching your plan's limit, you'll see a prompt to upgrade your plan. Click See upgrade options to view available plans and unlock more keys. You can manage your plan from your billing settings.
📝 Note: Currently, only the organization owner on a Team plan can create API keys. In the future, all team members will be able to create keys up to the plan limit.
| Plan** | API Keys | App Clients | Monthly Requests |
|---|---|---|---|
| Free | 1 | 1 | 3,000 |
| Essentials | 3 | 3 | 7,500 |
| Team | 5 | 5 | 15,000 |
**Are you an app developer building out an integration for multiple users and need higher rate limits? Please get in touch with our developer support team [developersupport@buffer.com] and provide a detailed overview of what you're building.
API key expiration and notifications
To help you stay on top of your integrations, Buffer sends automatic notifications at three points:
- Key created — You'll receive a confirmation when a new key is generated.
- Key expiring soon — You'll get a heads-up before your key expires so you have time to regenerate it without disrupting your integrations.
- Key expired — If a key expires, you'll be notified so you can take action right away.
API keys can expire based on their configured expiration date. If you see an expiration notice next to one of your keys, here's how to get back up and running:
- In your Developer Dashboard, find the expired key.
- Click the three-dot menu (⋯) next to the expired key.
- Select Regenerate.
- Copy the new key — it will only be shown once.
- Update the new key in every place you've used the old one: any integrations, scripts, automation tools, or third-party apps.
⚠️ Note: Simply regenerating the key won't automatically update it in your other tools — you'll need to replace it manually wherever the old key was used.
If you're not sure where you've used the key, check any automation workflows (such as Make.com, n8n, or Zapier) and any custom scripts or apps that connect to Buffer via API.
API key notifications
Buffer automatically sends email notifications to help you stay on top of your API key's status:
- Key created — You'll receive a confirmation email when a new API key is successfully generated, along with a reminder to store it securely.
- Key expiring soon — You'll be emailed 7 days before your key is set to expire, giving you time to regenerate it before your integrations are affected. API keys expire 30 days after they were created.
- Key expired — If a key expires without being regenerated, you'll receive an email letting you know that your API access has stopped working, with a direct link to generate a new key in your Developer Settings.
Connecting as a third-party app (OAuth)
If you're a developer building an integration that accesses Buffer on behalf of other users, you'll need to use OAuth rather than a personal API key. OAuth lets your users grant your app access to their Buffer account without sharing their credentials.
📝 This section is for developers. If you're connecting your own tools to Buffer, a personal API key is all you need.
Registering your app
- Head to Settings → API.
- Click the App Clients tab.
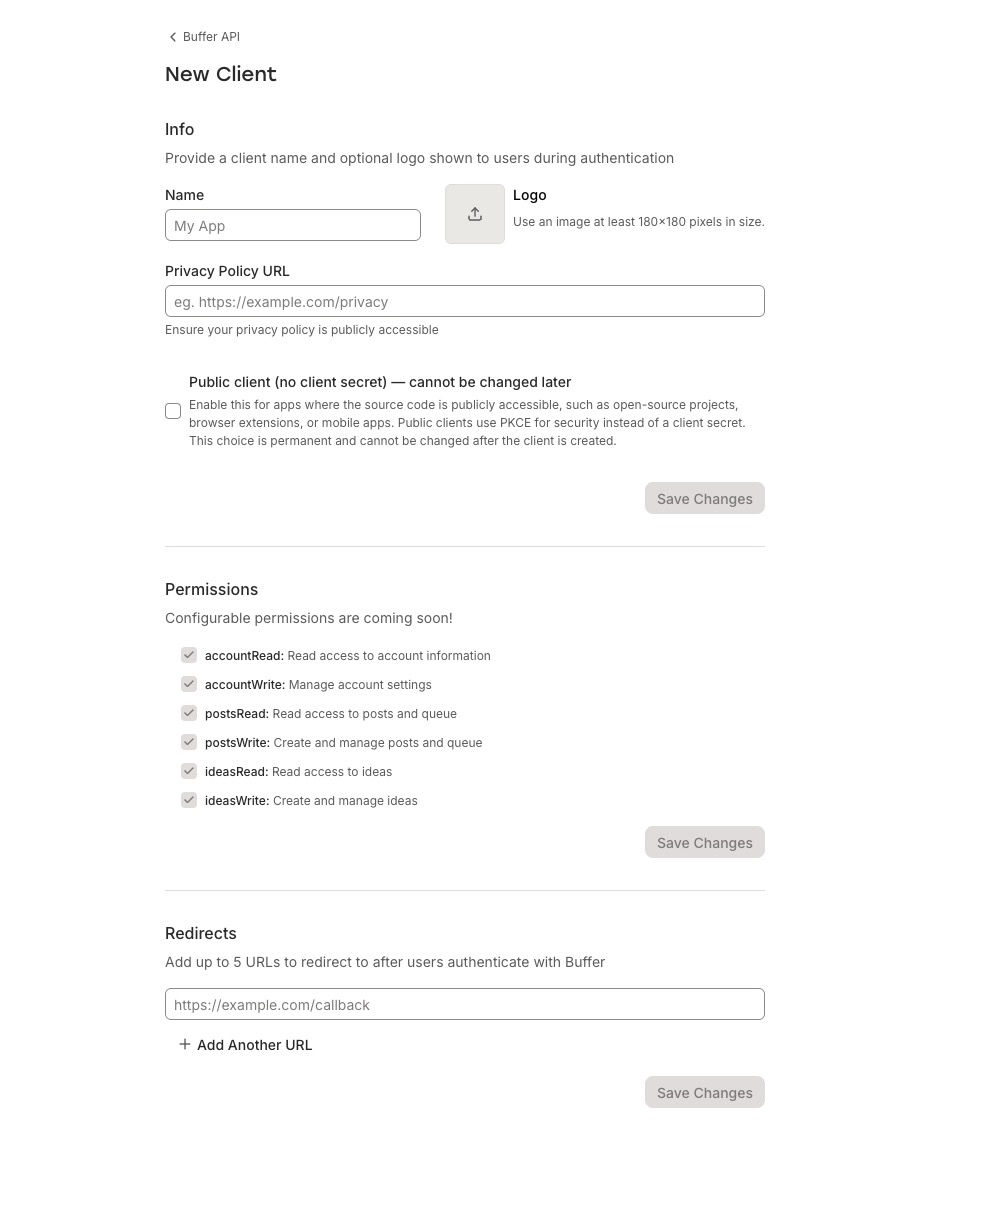
- Click + New Client.
- Under Info, fill in your app's Name and optionally upload a Logo (at least 180x180px). This is what users will see when they're asked to approve your app's access.
- Add your Privacy Policy URL -- make sure it's publicly accessible.
- If your app's source code is publicly accessible (e.g. an open-source project, browser extension, or mobile app), check Public client (no client secret). Note: this choice is permanent and can't be changed after the client is created.
- Under Redirects, add up to 5 redirect URLs. These are the URLs in your app where Buffer sends users after they approve access.
- Click Save Changes.
📝 Good to knows:
- The Permissions section lets you choose exactly which scopes your app needs. Tick the boxes for the scopes your integration requires — the consent screen users see when they connect your app will only show the permissions you've selected.
- You can request additional scopes for an existing client by editing it later. Scopes you've already been granted are shown as locked and stay granted — you can add new ones but you can't remove ones that have already been approved.
-
Available scopes today:
accountRead,accountWrite,postsRead,postsWrite,ideasRead,ideasWrite.Note: The
insightsReadscope (post-level analytics) is not available for App Clients. This is a requirement of the social platforms' terms of service, which only allow a user to read their own metrics. If you need analytics access, use a Personal API Key instead. - The reserved OIDC scopes
openidandoffline_accessare always included on token requests where applicable, regardless of what you tick. - If you have more than one Buffer account, you can switch between them while connecting a third-party app. On the Authorize screen, click Not you? Switch account next to your email to sign out and sign in as a different Buffer account.
After registration
Once your client is created, you'll receive a Client ID. If you didn't check the public client option, you'll also receive a Client Secret. Treat your client secret like a password -- don't expose it in client-side code or public repositories.
How it works
- Your app redirects the user to Buffer's authorization page.
- The user approves your app's requested permissions.
- Buffer redirects back to one of your registered redirect URLs with an authorization code.
- Your app exchanges that code for an access token.
- Your app uses the access token to make API requests on the user's behalf.
Access tokens expire after 1 hour. Request the offline_access scope to also receive a refresh token for long-lived access.
📝 Notes:
- Public clients use PKCE instead of a client secret during the token exchange. See the developer docs for implementation details.
- For implementation details, code examples, available scopes, and error handling, see our developer docs: Buffer API authentication guide
Understanding your API usage
Buffer's Developer Dashboard shows your API usage broken down by client, so you can see exactly how much of your rate limit each key or integration is using.
- Personal API keys: Your personal keys' usage is shown together in one group.
- App clients: Each app client (third-party integration or custom app) shows its own usage separately.
How rate limits work:
Rate limits are applied per client — each personal API key and each app client has its own limit, independent of your other clients. The rate limit for a client is based on the plan of the organization where the client was created.
Each client has three rolling rate limit windows:
| Window | Free | Essentials | Team |
|---|---|---|---|
| Per 15 minutes | 100 | 100 | 100 |
| Per 24 hours | 250 | 250 | 500 |
| Per 30 days | 3,000 | 7,500 | 15,000 |
All windows are rolling (not fixed to a clock boundary). They continuously slide forward from the time of your most recent requests.
If a client exceeds any of these limits, subsequent requests will return a 429 error until the window resets. The CLI will also surface a warning automatically when you've used more than 90% of your limit, and if you do hit the cap it'll tell you exactly how long to wait before trying again. MCP clients (Cursor, Claude, etc.) get a similar heads-up: when a rate-limit window is running low, the tool response includes an advisory so your AI assistant can slow down before it gets blocked.
📝 Note: Usage is shared across all your personal API keys as a group. App clients each have their own separate limits.
You can view current usage and limits for each client in your Developer Dashboard.
Using the Buffer CLI
If you're a developer, Buffer also offers a CLI (command line interface) — a tool that lets you interact with the Buffer API by typing commands directly into your computer's terminal, rather than building a full integration. It's handy for testing, scripting, and automating tasks without writing a lot of code.
To install the Buffer CLI, run the following in your terminal:
npm install -g @bufferapp/cli
Checking your rate limit status
The CLI can show your rate limit status as you work, so you don't hit limits unexpectedly.
- See live rate limit info: Add the
--verboseflag to any command to see your current requests remaining, total limit, and when the limit resets — displayed after each request. - Low-limit warning: If you've used more than 90% of your limit, the CLI will automatically show a warning so you can slow down before hitting the cap.
- 429 errors: If you do hit your limit, you'll get a clear message telling you exactly how long to wait before trying again — no guesswork.
- Check anytime: Run
buffer doctorto see your current rate limit status at any time, without making an API call. If you're parsing the output ofbuffer doctor --output json, note that two check IDs were recently renamed:auth-token-presentis nowauth-key-present, andauth-token-validis nowauth-key-valid. Update any scripts that reference the old IDs.
Keeping the CLI up to date
To update to the latest version, run:
buffer update
The CLI also checks for updates automatically each time it starts up. If a newer version is available, it'll let you know so you're always working with the latest features and fixes.
Supported functions & social channels
Functions
Posts - Create new posts and edit existing posts with: text, media (images & videos), and channel-specific features (like first comment and threaded posts).
Ideas - Create text and image-only ideas, list ideas you already have in Buffer (optionally filtered by tag or group), and list the idea groups (the columns on your Ideas board) for an organization.
Fetching data - In addition to the actions above, Buffer's API also supports several queries, meaning you can fetch data from your Buffer account programmatically. These include things like retrieving your profiles, scheduled posts, sent posts, and more. You can browse all available queries in the Buffer API reference.
Post metrics (experimental)
The API also exposes post-level analytics, in an early/experimental form. You can:
- Read a post's normalized metrics and a timestamp showing when those numbers were last updated, on any post returned by the API.
- Use the
aggregatedPostMetricsquery to roll up metrics across a filtered set of posts (by organization, date range, and optionally by channels or tags) — useful for things like year-end summaries or per-channel totals without paginating through every post.
Two things to keep in mind:
- These types are marked experimental in the schema, meaning the shape may change as the team iterates. We don't recommend depending on them in production integrations yet.
- Reading metrics requires the
insightsReadOAuth scope, and queries are capped to a 365-day window per request. Note:insightsReadis available for Personal API Keys and MCP clients, but not for third-party App Clients.
For exact schema and examples, see the Buffer's developer docs..
📝 Notes:
- Note: Custom video thumbnails aren't supported. If your API call includes
thumbnailUrlon a video asset, it will now return anInvalidInputError. To pick a thumbnail on Instagram, TikTok, or Pinterest, usemetadata.thumbnailOffset(a timestamp offset into the video) instead. - Posts created via the API respect your channel access role. If you're set to Requires Approval on a channel, posts you create via the API are saved as drafts awaiting approval, just like posts you create in the Buffer dashboard. Learn more about user permissions here.
Supported social networks
At this time, our API supports posting to Instagram, Threads, LinkedIn, X/Twitter, Facebook, TikTok, Google Business Profiles, Mastodon, YouTube, Pinterest, and Bluesky.
📝 Notes:
- For TikTok, make sure your media stays available at the provided URL until your post publishes, not just at the time of scheduling. Moving or deleting it beforehand may cause your post to fail.
- Start Page is not supported via Buffer's public API. While Start Page works as a channel inside Buffer, you can't create or edit Start Page posts programmatically through the API.
Hosting media for use with the API
When you include an image or video in a post via the API, Buffer doesn't accept file uploads directly. Instead, the media needs to be hosted somewhere online and shared as a public URL -- a link that anyone (or any tool) can open without logging in.
📝 Important Note: Google Drive links don't work for this. Drive links require the viewer to be signed in, so Buffer's API can't retrieve the file. The same applies to any storage service that restricts access by default.
The good news is there are a few free tools that make hosting media straightforward.
Recommended media hosting options
Cloudinary
Cloudinary is a media management platform with a generous free tier. Once you upload an image or video, you'll get a direct, publicly accessible URL you can use straight away.
It also has optional features for resizing and transforming images, which can be handy for making sure your media meets each network's requirements before it goes into Buffer.
Cloudflare R2
Cloudflare R2 is an object storage service with a free tier. It's a good fit if you're already working with Cloudflare, or if you're comfortable with a slightly more technical setup. Once a file is uploaded and your bucket is set to public, the resulting URL works reliably with Buffer's API.
How to check if a URL will work
Before plugging a media URL into your workflow, open it in an incognito or private browser window. If the file loads there without asking you to sign in, it'll work with the API. If it prompts for a login or shows an error, you'll need to adjust the sharing settings or switch to a different hosting option.
💡 Tip: Once you've confirmed a URL works in incognito, it's worth saving it somewhere handy. The same link can be reused across multiple posts or workflows as long as the file stays in place.
Workflow Automations (No Coding Required)
Workflow tools let you create automations using visual builders and simple logic like:
When this happens → Do that in Buffer
These workflows can be very simple (one trigger → one action) or more advanced, with multiple steps that transform, filter, or enhance content before anything is sent to Buffer.
Common workflow tools
You can connect Buffer with:
- Zapier
- Make
- IFTTT
- n8n
Each tool works a little differently, but the overall setup usually follows the same pattern: choose a trigger, connect Buffer, and define what should happen next.
Example workflow: Automatically share new blog posts to Buffer
Scenario (Given / When / Then)
Given you publish a new article on your website
When a new post appears in your blog feed
Then Buffer creates a social post and adds it to your queue
Step-by-step setup (general flow)
-
Choose a trigger.
Example: “New RSS feed item” or “New blog post published”
Connect Buffer as the action app.
Log into Buffer when prompted and enter your API key if required
Set the action.
Action: Create a post in Buffer
Choose:
- The channel
- The post text (often the article title + link)
- Whether to publish immediately or add to the queue
-
Test the workflow.
Use the tool’s Test or Run once option and confirm a post appears in Buffer
More advanced workflows with logic, filters, and AI
Tools like n8n let you build more powerful workflows with extra steps between the trigger and Buffer.
These workflows can include:
- Logic (only continue if certain conditions are met)
- Transformations (reformatting or combining content)
- AI steps (rewriting text, generating captions, or enriching data)
Instead of sending content directly to Buffer, you can shape and improve it first.
Workflow ideas you can build
Here are some real-world examples of how multi-step workflows can create posts or ideas in Buffer:
| Goal | Trigger | What happens in the workflow | Result in Buffer |
|---|---|---|---|
| Capture content ideas from planning docs | New item in Notion database | Pulls the title + content and formats it | Creates a Buffer Idea for later review |
| Turn submissions into polished posts | Form submission received | AI step rewrites or enhances the copy | Creates a ready-to-publish post |
| Share new videos with captions | New file added in Google Drive folder | AI generates a caption for the video | Creates a post with video + caption |
| Curate industry news | New RSS feed item | Filters by keywords and enriches the content | Creates a Buffer Idea instead of auto-posting |
| Batch content on a schedule | Scheduled time (e.g. weekly) | Pulls from multiple sources and formats content | Creates scheduled posts in Buffer |
These examples can be simple or complex depending on how many steps you include between the trigger and Buffer.
How to verify your workflow is working
After turning your workflow on:
-
Trigger the event (add a Notion item, upload a file, submit a form, etc.)
Check that:
- A post or idea appears in Buffer
- The correct channel is selected
- The text, links, or media look right
- If nothing happens:
- Double-check your API key
- Make sure the workflow is switched ON
- Confirm the trigger app is updating as expected
Using MCPs & AI assistants (“vibe coding”)
MCP tools let AI assistants connect to Buffer so you can create or manage posts using natural language.
You might use tools like Cursor, Zapier, n8n, Claude, ChatGPT, Notion, Perplexity, Manus, Antigravity, or Raycast to build small apps or automations that talk to Buffer’s API.
To connect MCP tools:
- Head to Settings → API.
- Click Browse Integrations under the Connect an Agent section.
- Select the integration you want to set up -- you'll see setup steps specific to that tool.
- If the integration you picked uses a personal API key (e.g. n8n), and you haven't generated one yet, click + New Key to generate one.
- Note: OAuth-based integrations (e.g. Cursor, Zapier, ChatGPT, Notion, Claude, Perplexity, Raycast) skip this step — Buffer's setup screen will only show the API-key step when it's actually needed.
📝 Notes:
- Connecting Buffer to Zapier (including the AI/MCP flow) no longer requires pasting an API key — Zapier now connects to Buffer over OAuth. Head to Settings → Integrations → Zapier for full steps.
- The Buffer MCP server connects to a Notion custom agent, not Notion's built-in AI chat. You'll need to enable "Custom MCP servers" in Notion's Settings → Connections → Manage, then add the Buffer MCP server to a custom agent.
✨ Tip: When you connect a new integration you'll see prompts under Try It Out to help get you going! These may include things like, "Show me my upcoming scheduled Buffer posts for the week" or "List all my Buffer channels."
Example MCP scenario: “Post this idea to LinkedIn”
Given you have an AI assistant connected to Buffer
When you say: “Share this as a LinkedIn post in Buffer tomorrow at 9am”
Then the assistant sends that request to Buffer using your API access
General MCP setup steps
-
Add Buffer to your MCP tool
Look for “Add API” or “Add integration” and enter your Buffer API key. If the tool supports OAuth (like Cursor), you'll see a Connect button in Buffer's setup screen instead of an API-key step — clicking it opens an approval prompt and finishes the connection automatically. No key needed
-
Tell the AI what it’s allowed to do
Example: “You can create and schedule posts in Buffer.”
-
Try a simple request
“Create a draft post in Buffer that says ‘Hello world.’”
-
Confirm inside Buffer
Check that the post appears as expected.
How to verify MCP is working
-
Ask the AI to create a draft post
Look in Buffer to confirm:
- The post exists
- The text matches your request
- It’s assigned to the correct channel
If it fails:
- Recheck your API key.
- Make sure your Buffer permissions allow posting.
- Look for error messages in your MCP tool’s activity or logs.
Handling errors & edge cases
| Issue | What to check |
|---|---|
| Can't generate an API key / option not appearing | Make sure your Buffer account email is verified. Head to Settings → Account and look for a verification prompt, or check your inbox for a verification email from Buffer. |
| Post not appearing in Buffer | Is your API key correct? Is your workflow turned on? |
| Posted to wrong channel | Is the correct channel selected in setup? |
| AI says it posted but nothing shows | API access expired or permissions too limited |
| Duplicate posts | Workflow triggered more than once |
| Authorization error |
For MCP integrations that use a personal API key, check to make sure { "mcpServers": { "buffer": { "command": "npx", "args": [ "-y", "mcp-remote", "https://mcp.buffer.com/mcp", "--header", "Authorization: Bearer API_KEY" // <-- The 'Bearer' prefix here ] } } } |
| Video not attaching / media URL error | The media URL must be publicly accessible. If it returns Cross-Origin Resource Policy (CORP) headers or requires authentication, the API can't retrieve the file and will return an error. Open the URL in an incognito tab to confirm it's accessible. If it doesn't load there, it won't work in the API either. |
| Hitting API usage limits unexpectedly | Head to your API settings within Buffer and check the usage breakdown by App Client to see which integration is consuming the most capacity. |
| Claude MCP integration not working | Make sure Node.js version 18 or higher is installed. If you have multiple versions installed, confirm that Claude Desktop is using version 18+ instead of an older version. |
FAQ
How many API keys can I have?
Paid accounts can generate up to five API keys. Free accounts are limited to one key.
Having multiple keys is useful if you're connecting Buffer to several tools or workflows and want to keep access separate. For example, one key for Zapier and another for your Claude MCP setup.
What happens if I downgrade my plan?
If you downgrade from a paid plan to the Free plan while you have multiple API keys, all API keys except your original (earliest-created) key will be automatically revoked. You'll receive a notification when this happens so you can update any integrations that use the revoked keys before they stop working.
Does API usage count separately for each key?
It depends on the client type.
Personal API keys share a single usage pool — having multiple keys doesn't give you more API capacity, it just gives you more flexibility in how you manage access across tools and workflows.
App clients (OAuth integrations you've registered) each have their own separate usage limits, independent of your personal keys and of each other.
You can see the breakdown for both in your Developer Dashboard.
How do I see which tools are using my API quota?
Head to Settings → API and look for the API Usage section. You'll see a breakdown of API activity by App Client — so if you have Buffer connected to Zapier, Make, and a Claude MCP, you can see how much each one is using.
This is handy if you're approaching your usage limits and want to understand where the activity is coming from.
How do I generate a new API key?
- Head to Settings → API.
- Click + New Key.
- Optionally, give your key a name (e.g. "Zapier" or "n8n workflow") so you can tell them apart later.
- Choose an expiration period — 7 days, 30 days, 60 days, 90 days, or 1 year.
- Click Generate API Key, then copy it and paste it into the tool you're connecting.
💡 Note on the displayed key: For security, the dialog shows the key masked — bullets followed by the last 4 characters of your key (for example, ••••••••••••••••6789 ). Don't worry — the Copy key button copies the full, real token to your clipboard. Paste it into the tool you're connecting and confirm the pasted value starts with the expected prefix.
Can I name my API keys?
Yes! When generating a key, you can give it an optional name (like "Make automation" or "Claude MCP"). This makes it easier to manage multiple keys and know which one to revoke if something stops working.
Do API keys expire?
Yes — when generating a key, you choose how long it stays valid:
- 7 days
- 30 days (default)
- 60 days
- 90 days
- 1 year
Make sure to renew or replace keys before they expire to avoid any disruption to connected workflows.
✨ Tip: Setting a longer expiration (like 1 year) is a good choice for stable, long-running integrations.

How do I revoke or delete an API key?
On the API settings page, click the ⋮ (three-dot menu) next to any key to manage or delete it. If you think a key has been compromised, delete it and generate a new one straight away.
⚠️ Generating a new key in place of an existing one will immediately revoke the old key — any tools or scripts using it will stop working until you update them with the new key.
How do I keep my API keys secure?
Treat each API key like a password. A few best practices:
- Give each key a descriptive name so you always know what it's connected to
- Use a separate key per integration so you can revoke one without disrupting others
- Delete any keys you're no longer using
- Choose an expiration window that matches how long you expect to use the integration
Want to go deeper? This guide focuses on simple, everyday setups. If you want to build more advanced or custom integrations using Buffer’s API, our developer documentation walks through everything step by step.